Something we all have to do as photographers is sell ourselves along with our services.One of the latest marketing tools for photographers is the promotional slideshow video. Here's my first attempt:
For now this is just a training exercise and I limited it to what can be done in a free 30 second video. To make longer videos you have to "Upgrade" to a paid account.
Animoto is located here: http://animoto.com
I was not thrilled with Animoto's process. You select a theme, upload your images, select some music and Animoto creates their video. You have no creative control. You get what Animoto decides you should get. How long each image is displayed, and how many images is controlled by Animoto and depending on the music you have selected Animoto may or may not display all of the images you uploaded for your free 30 second video.
The interface is kludgy.
There is no preview function. The only way to find out what your slideshow will include is to wait for the video to render and watch the playback. It takes several minutes to render the video before you can see what you are going to get.
If all of the images are not there, the only thing you can do is rebuild the slideshow using fewer images. Once you have made your changes, you again have to wait for Animoto to render the video before you can see whether it is going to work.
Animoto says a 30 second video will use 12 - 20 images depending upon the music selected. I started with 18 images, but there are only 14 images in this slideshow. That's all Animoto would render into the 30 second video. Theoretically, you can add titles and text, but I was not able to do so. For each title I wanted to add, I would have to remove one of the remaining 14 images.
This 30 second video took over 6 hours to produce. I had to start over twice and re-render it a dozen times before I could get a marginally acceptable result. I want tools that give me more control over the creative process while taking much less time and energy. I want to be able to add titles and text without having to sacrifice images.
From my experience creating a "free" 30 second video, I'm not confident Animoto will give me those tools.
Every step of the way I was badgered to "upgrade" to a pro account. I'm not sure I will upgrade.

Weddings, Portraiture, Nature, Travel
Saturday, July 9, 2011

Wednesday, July 6, 2011
Rockets Red Glare

I had an idea for the fourth of July. I was going to find a small town and photograph the spectators at their annual parade.
No small town fourth of July parades this year. Bad economy. Budget cuts. Oh well, Plan B.
Asheboro, NC, where I go to school, is a mid-size town. They didn't have a parade this year, but they had the next best thing ... a baseball game and fireworks.
Mother nature added some fireworks of her own. Fortunately far enough away to not affect the game. There was a short rain, but the thunderstorms passed far to the north and east.

The sunset was worth waiting for.
For the technically inclined, it's a 4 shot panorama - Pentax K20D, Tokina ATX-Pro 28-70 f/2.8 zoom @ 28mm, ISO 800, f/5.0 @ 1/50 sec. It's lit using a Vivitar 285HV at full power through a Photoflex Q39 softbox. All handheld. Manual mode. Pre-focused to hyper-focal distance. In camera JPEG High.
The fireworks are ISO 100, f/16 @ bulb on a tripod.
It's a funny thing.
A year ago I was going to every Copperheads home game photographing baseball for my small format class. My images of game play are not much to write home about. I'm not much of a sports photographer. My first photographic love is nature photography. I'm going to school to learn to be a good people photographer.
One image of Copperhead fans watching the game against another sunset stands out from all the images I made last summer.

Shot with almost exactly the same equipment, from almost exactly the same spot.
This was likely the last Copperheads baseball game I will attend. I graduate at the end of this month and head back to the big city for the rest of my life. Unless ...
I know I'm going to be a professional photographer when I grow up. But maybe not in the big city.
If things work out, I'll find another mid-size town somewhere and relocate. And maybe they'll have a home town baseball team. It won't be Asheboro, there's too much competition here. I need a place that doesn't have one of the best photography schools in the world.
But, if I do find a new home town, and if they do have a team, I'll see you at the game. I'll be easy to recognize. I'll be watching the fans watch the game. If there's a beautiful sunset, smile for the camera.
And, if you ever find yourself in Asheboro, NC on the fourth of July with nothing to do, head on out to McCrary Park and take in the game and the fireworks show.
Tuesday, June 21, 2011
Idée fixe
I have this idea for an image. I can see it when I close my eyes. And it's not really that great of an idea; a cliche actually, almost kitsch.
It's producing an acceptable image I can see when my eyes are open that's proving to be the problem. If I can ever get it right, I can get it out of my head.

Right now it's not working ... not even close.
I'll have to put it away and come back to it later. Maybe then I can get some work done in the meantime.
The last time this happened I had 20 years of failure before I finally got the image I wanted. I don't think I've got that much time for this one.
It's producing an acceptable image I can see when my eyes are open that's proving to be the problem. If I can ever get it right, I can get it out of my head.

Right now it's not working ... not even close.
I'll have to put it away and come back to it later. Maybe then I can get some work done in the meantime.
The last time this happened I had 20 years of failure before I finally got the image I wanted. I don't think I've got that much time for this one.
Tuesday, June 14, 2011
On The Road Again
One of the ideas suggested by Mollie Isaacs of Awake The Light at the Grandfather Mountain Nature Photography weekend was a technique for producing motion blurred images. She suggested that you have your partner drive down the road slowly while you hand-hold your camera and shoot through the windshield using a slow shutter speed.
Mary Lindhjem suggested a speed of no more than 5 mph.
I wanted to give it a try, but not having a partner to drive for me, I had to improvise.
I started by securely strapping my tripod in the passenger seat and mounting the camera to it. I connected my remote shutter release to the camera.
The camera was set to aperture priority auto-exposure with +1/3 stop exposure compensation at f/11; manual focus, focused as close to the Hyperfocal Distance as I could manage. For this particular lens at f/11, that gives a D.O.F. stretching from about 10 feet to infinity.
I left the in camera shake reduction turned on.
The road I chose is the main road in William B. Umstead State Park in Raleigh, NC. This is the eastern section off of Glenwood Ave (US Hwy 70). This road already has a low speed limit at 25mph, so there was less risk for me driving it at 5 mph.
Mary Lindhjem suggested a speed of no more than 5 mph.
 |
| Pentax K-20D, Tokina ATX-Pro 80-200 zoom @ 80mm, ISO 100, f/11 @ 1/2 second |
I wanted to give it a try, but not having a partner to drive for me, I had to improvise.
I started by securely strapping my tripod in the passenger seat and mounting the camera to it. I connected my remote shutter release to the camera.
The camera was set to aperture priority auto-exposure with +1/3 stop exposure compensation at f/11; manual focus, focused as close to the Hyperfocal Distance as I could manage. For this particular lens at f/11, that gives a D.O.F. stretching from about 10 feet to infinity.
I left the in camera shake reduction turned on.
The road I chose is the main road in William B. Umstead State Park in Raleigh, NC. This is the eastern section off of Glenwood Ave (US Hwy 70). This road already has a low speed limit at 25mph, so there was less risk for me driving it at 5 mph.
Tuesday, June 7, 2011
Grandfather Mountain Nature Photography Weekend

My first love is nature and wildlife photography. That's where the two lanes lead me to. I didn't think I'd get the chance to attend this year's program, but the opportunity came up at the last minute, so I grabbed it.
The Nature Photography Weekend is an annual photography event at Grandfather Mountain. Along with the chance to meet and compare notes with others who share an interest in nature photography the weekend includes evening presentations from some top nature photographers. This year's speakers included:
Tony Sweet
http://www.tonysweet.com/
Tony spent 20 years as a professional jazz musician before switching to photography. Tony's images show the influence of his jazz career. He's the master of photoshop improvisation.
Take a Tony Sweet workshop and you'll be talking about it years later.
Bill Fortney
http://www.billfortney.net/Welcome.html
Bill a Nikon Professional Services tech rep for the southern US, and amateur pilot. Bill is the author of America From 500 Feet, a runaway best seller of aerial nature photography.
Bill Lea
http://www.billlea.com/
Bill Lea is a perfectionist at finding "just the right light." He's the go to guy for photography in the Great Smokey Mountains National Park.
Vinnie Coluci
http://www.nspwphoto.com/
Vinnie, along with his partner Melissa Southern hosts Next Step Photography Workshops. This year at Grandfather mountain his presentation was on how to get zoo photos that appear to have been taken in the wild.
Mollie Isaacs & Mary Lindhjem
http://www.awakethelight.com/
The final presentation was "Work It, Baby" by Mollie Isaacs & Mary Lindhjem of Awake The Light. Find the scene, find the scene within the scene and WORK IT!
And then there's the contest, with the Mark and Doug show. The contest offers the chance for attendees at the to photograph on the mountain and show their skills.
All I can say about the contest is to repeat THE PLEDGE: "I will not take the contest too seriously."
Wednesday, June 1, 2011
Memorial Day
I'm a little late with this, but I wanted remember my friend Nathan.
I think I was in my first year of high school when Nathan's parents moved into the house behind ours. Nathan was their second child. He was a bit wild and frequently in trouble at school. Not a bad person, he just didn't like school and he wasn't shy about saying so; more of a cut up than a real trouble maker.
He was four years younger than me, and always hanging around. Kind of like having a second little brother to bug you. He and my brother became best friends.
I moved away to go to college while they were in junior high school, and only saw him a few times after that. But I heard about him from time to time from my brother .

He dropped out of school at 17 when his mama signed the papers for him to join the Marines. He grew up there. He was proud of his service and proud of his uniform. I don't know why he chose to end his own life.
I go see him a couple times a year. We all miss him.
I think I was in my first year of high school when Nathan's parents moved into the house behind ours. Nathan was their second child. He was a bit wild and frequently in trouble at school. Not a bad person, he just didn't like school and he wasn't shy about saying so; more of a cut up than a real trouble maker.
He was four years younger than me, and always hanging around. Kind of like having a second little brother to bug you. He and my brother became best friends.
I moved away to go to college while they were in junior high school, and only saw him a few times after that. But I heard about him from time to time from my brother .

He dropped out of school at 17 when his mama signed the papers for him to join the Marines. He grew up there. He was proud of his service and proud of his uniform. I don't know why he chose to end his own life.
I go see him a couple times a year. We all miss him.
Tuesday, May 24, 2011
Where you been so long?
I been a-havin'some hard travelin',
I thought you knowed.
I been a-havin'some hard travelin',
Way down the road.
Woody Guthrie.
I started this blog as an assignment for a class I was taking for my course in Photo Studio Management at Randolph Community College. That class is over but the blog remains. In the meantime I've had some bumps along the way.
I was diagnosed with an aggressive cancer just about the time I started this blog back in August 2010. I've been undergoing treatment - radical surgery & radiation treatments - while trying to keep up with my school work, including an internship during spring semester. I'm back in school now for my final semester.
But there have been some good things too.
At the end fall semester, between cancer treatments, I had a once in a lifetime opportunity to make a trip to China.
I was pretty sick at the time, but I couldn't let the opportunity get past me, so I just sucked it up and went. I'm not real impressed with my photography from that trip. I really wasn't at the top of my game. But ... vini, vidi, vinci!
I thought you knowed.
I been a-havin'some hard travelin',
Way down the road.
Woody Guthrie.
I started this blog as an assignment for a class I was taking for my course in Photo Studio Management at Randolph Community College. That class is over but the blog remains. In the meantime I've had some bumps along the way.
I was diagnosed with an aggressive cancer just about the time I started this blog back in August 2010. I've been undergoing treatment - radical surgery & radiation treatments - while trying to keep up with my school work, including an internship during spring semester. I'm back in school now for my final semester.
But there have been some good things too.
 |
| Tian Tan Buddha, Po Lin Monastery, Hong Kong, China |
I was pretty sick at the time, but I couldn't let the opportunity get past me, so I just sucked it up and went. I'm not real impressed with my photography from that trip. I really wasn't at the top of my game. But ... vini, vidi, vinci!
Tuesday, December 28, 2010
White Christmas
I've been out of town for a while. That will be the subject of future posts.
But I arrived back here in Asheboro for what was for me personally a significant event.
I'm 61 years old and I've never seen a white Christmas. Until this year.
We don't get a lot of snow here in central North Carolina. Half an inch is enough to panic the area into total gridlock and shut it down for over 12 hours (January 19, 2005).
Bad weather makes good photography. This old farmstead is up the road from my Mother's home. I took it in 2005, the day after the storm paralyzed Raleigh with a half inch of snow.
This year we got two inches starting at about 6:30 pm Christmas Day. I saw it when I went out for my annual "Christmas Day Chinese Restaurant" dinner. The news says the last time the area had snow at Christmas was 1947, two years before I was born.
I took this one out the sliding door at my apartment here in Asheboro, NC the next morning, on Boxing Day. It's not much to look at really, just a back yard with a little bit of snow and the church next door, but for me it's a small Christmas miracle.
But I arrived back here in Asheboro for what was for me personally a significant event.
I'm 61 years old and I've never seen a white Christmas. Until this year.
We don't get a lot of snow here in central North Carolina. Half an inch is enough to panic the area into total gridlock and shut it down for over 12 hours (January 19, 2005).
 | |
| Pentax *istD, Tokina ATX-Pro 28-70f/2.8, ISO Aperture & Shutter Speed not recorded. |
Bad weather makes good photography. This old farmstead is up the road from my Mother's home. I took it in 2005, the day after the storm paralyzed Raleigh with a half inch of snow.
This year we got two inches starting at about 6:30 pm Christmas Day. I saw it when I went out for my annual "Christmas Day Chinese Restaurant" dinner. The news says the last time the area had snow at Christmas was 1947, two years before I was born.
 |
| Pentax K20D, Tokina ATX-Pro 28-70f/2.8, ISO 400 1/250sec @ f/8.0 |
I took this one out the sliding door at my apartment here in Asheboro, NC the next morning, on Boxing Day. It's not much to look at really, just a back yard with a little bit of snow and the church next door, but for me it's a small Christmas miracle.
Monday, December 6, 2010
My Kitchen Timer
One of the problems with being a bachelor is having to eat your own cooking. You can live strictly on soup out of cans, microwave meals and fast food take-out but it gets really old. Especially if you're doing it for years and years. Sooner or later you're going to go in the kitchen and actually cook something.
And eating pre-prepared food is expensive. The economy being what it is and my budget being what it is, I can't afford to dine out every meal. Good home cooking costs less and it's better for you.
Eventually, you're going to get to a place where you need to cook something for a certain length of time, like boiling pasta for exactly 7:00 minutes to get it perfectly Al Dente. Which is where the kitchen timer comes in. Set it and you don't have to watch the clock like a hawk to ensure you get the right time. You can let your attention wander to other things, like getting the sauce to the right temperature and toasting the bread. A good timer is an essential tool for kitchen multi-tasking.
I'm living in an apartment down here at school. I've brought about half my kitchen utensils, pots & pans and dishes down here. The rest of my stuff is still at home. But I've only got one kitchen timer ... or so I thought.
I don't do much "darkroom" processing right now, just the occasional roll of B&W film. I use a hybrid system where I scan the negatives and make digital prints.
I can load B&W film onto the reels and place the reels inside the processing tank using a dark bag. Once the top is closed, I can perform the rest of the process right there at the kitchen sink.
So the timer serves dual duty.
The pasta was delicious BTW.
And eating pre-prepared food is expensive. The economy being what it is and my budget being what it is, I can't afford to dine out every meal. Good home cooking costs less and it's better for you.
Eventually, you're going to get to a place where you need to cook something for a certain length of time, like boiling pasta for exactly 7:00 minutes to get it perfectly Al Dente. Which is where the kitchen timer comes in. Set it and you don't have to watch the clock like a hawk to ensure you get the right time. You can let your attention wander to other things, like getting the sauce to the right temperature and toasting the bread. A good timer is an essential tool for kitchen multi-tasking.
I'm living in an apartment down here at school. I've brought about half my kitchen utensils, pots & pans and dishes down here. The rest of my stuff is still at home. But I've only got one kitchen timer ... or so I thought.
 |
| Pentax K-20D, SMC PENTAX-DA 18-55mm F3.5-5.6 AL II, ISO400, f/5.6 @ 1/8 sec |
I can load B&W film onto the reels and place the reels inside the processing tank using a dark bag. Once the top is closed, I can perform the rest of the process right there at the kitchen sink.
So the timer serves dual duty.
The pasta was delicious BTW.
Thursday, December 2, 2010
Something to be Thankful for
I'm only about a week late. I had a little bit of a rough patch in my life recently.
But I'm getting through it with a little help from my friends. And I want to say thanks to all of you.
I'm also thankful for these folks:
This is the VA Medical Center in Durham, NC. It's just a snapshot really, no great work of art. I've no pretention that it's an image of any significance in the greater scheme of things. But this is a photography blog, and that's a photograph.
The picture is not important, but the VA Medical Center means a lot to those it serves. I'm lucky enough to be among them. I recently spent almost a week there and they are some of the kindest, most caring people you will ever meet. They take their mission to serve the Veteran most seriously.
Because of their care, I got to have a quiet Thanksgiving at home.
It looks like I may get to stick around for a few more Thanksgivings to come ... and Christmas, family birthdays, anniversaries, school holidays ... all the reasons for family to get together.
And that is something to be thankful for.
But I'm getting through it with a little help from my friends. And I want to say thanks to all of you.
I'm also thankful for these folks:
 |
| Pentax K-20D, SMC-DA 18-55f/1:3.5-5.6 ISO 100 1/100@f/8 |
The picture is not important, but the VA Medical Center means a lot to those it serves. I'm lucky enough to be among them. I recently spent almost a week there and they are some of the kindest, most caring people you will ever meet. They take their mission to serve the Veteran most seriously.
Because of their care, I got to have a quiet Thanksgiving at home.
It looks like I may get to stick around for a few more Thanksgivings to come ... and Christmas, family birthdays, anniversaries, school holidays ... all the reasons for family to get together.
And that is something to be thankful for.
Tuesday, November 16, 2010
Creating a Signature Brush in Photoshop
Start a new blank file - File|New from the menu - and fill it with white. 300x300 pixels should be adequate or you can make it larger to give yourself more working room and crop it to size later. The final image created for this demonstration is cropped to 300x104 pixels.
 You can make your brush with the Type Tool or create it free-hand with the Brush Tool. I chose a combination of free-hand and text for my brush.
We'll get the easy part out of the way first.
Set the foreground color to Black. Create a New Layer, choose the Type Tool and hold down ALT while you type 0169 using the numeric keypad. When you release the ALT key you get a copyright symbol "©".
[Apple gets off easy. It's just Option+G].
Type in the year and then your copyright message. Because we put the copyright on its own layer it will be easy to go back and change the year to the next year when we need to.

If you're on a laptop, you'll need to use your special function to choose the numeric keypad overlay. Remember to turn it off afterward so you can continue to type.
Once you have your text created, you can size it to fit with the Move Tool. Check the box that says "Show Transform Controls". Hold down SHIFT and drag the corners to keep it proportional.
Now comes the fun part. Create another new layer, choose the Brush Tool and sign your name.

You can use a pen tablet or the mouse to write your name. If you don't have a pen tablet and can't write well with the mouse, get a cheap caligraphy pen from the art store and practice writing your name on copy paper. When you get good at it, write it large a single time on one sheet. Tape it to the wall where it will be evenly lit and photograph it with a digital camera.
If your hand writing is as execrable as mine this may take some time. I ended up having to do it on multiple layers and paste the best parts together.
Save your work as a Photoshop .PSD file so you can come back to it later when you need to change the year.
Turn off the eye next to the background layer. CTRL+Click the signature layer. CTRL+SHIFT+Click the copyright text layer. Both layers will now be selected. Alternatively, you can merge the two layers after saving the file. The key is the background layer is still there, but invisible.

And there you have it, a ready made signature for your images.
It's a brush, so you can sign your images in any color "ink" just by setting the foreground color. An acceptable gold color comes from R=98, G=89, B=1.
It's re-sizable using the square bracket keys, and you can use the "Fx" palette to emboss, embellish and gussy it up if you want to.
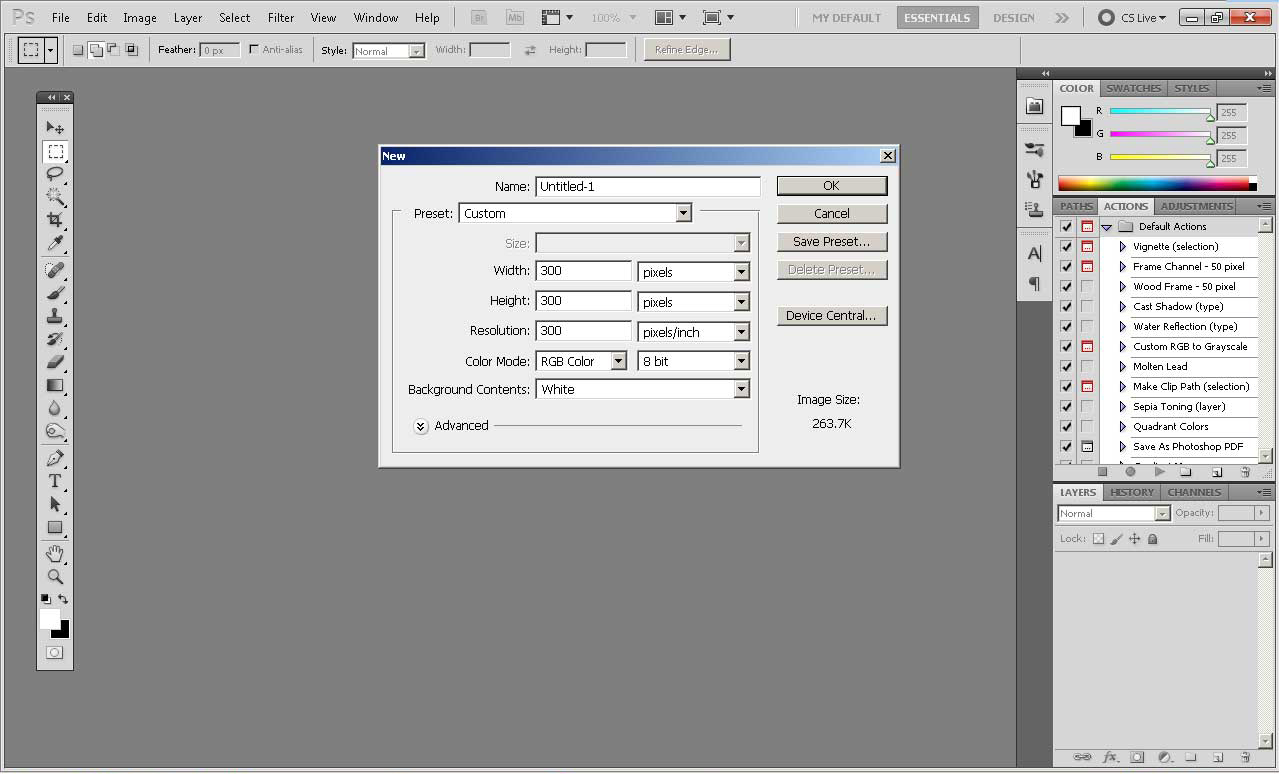
We'll get the easy part out of the way first.
Set the foreground color to Black. Create a New Layer, choose the Type Tool and hold down ALT while you type 0169 using the numeric keypad. When you release the ALT key you get a copyright symbol "©".
[Apple gets off easy. It's just Option+G].
Type in the year and then your copyright message. Because we put the copyright on its own layer it will be easy to go back and change the year to the next year when we need to.

If you're on a laptop, you'll need to use your special function to choose the numeric keypad overlay. Remember to turn it off afterward so you can continue to type.
Once you have your text created, you can size it to fit with the Move Tool. Check the box that says "Show Transform Controls". Hold down SHIFT and drag the corners to keep it proportional.
Now comes the fun part. Create another new layer, choose the Brush Tool and sign your name.

You can use a pen tablet or the mouse to write your name. If you don't have a pen tablet and can't write well with the mouse, get a cheap caligraphy pen from the art store and practice writing your name on copy paper. When you get good at it, write it large a single time on one sheet. Tape it to the wall where it will be evenly lit and photograph it with a digital camera.
If your hand writing is as execrable as mine this may take some time. I ended up having to do it on multiple layers and paste the best parts together.
Save your work as a Photoshop .PSD file so you can come back to it later when you need to change the year.
Turn off the eye next to the background layer. CTRL+Click the signature layer. CTRL+SHIFT+Click the copyright text layer. Both layers will now be selected. Alternatively, you can merge the two layers after saving the file. The key is the background layer is still there, but invisible.

From the Menu select Edit|Define Brush and give it a clever name like "Copyright Brush".
And there you have it, a ready made signature for your images.
It's a brush, so you can sign your images in any color "ink" just by setting the foreground color. An acceptable gold color comes from R=98, G=89, B=1.
It's re-sizable using the square bracket keys, and you can use the "Fx" palette to emboss, embellish and gussy it up if you want to.
Monday, November 15, 2010
Building the Book
I've mentioned before that I am a student in Portrait Studio Management at Randolph Community College. The curriculum is intended to give us as much experience as possible creating the products we'll need to be able to sell our clients if we're actually going to make some kind of living from the business of Photography.
Our current project is creating a presentation Wedding Book.
http://www.albexus.com/
Each student is required to create six pages as if we were putting together the entire album for a client.
I created a template for a 10"x10" album with true panoramic pages. It's essentially a 20" wide x 10" high page configured for 300 dpi.

I added guides at 1/2" in from each edge and guides for the horizontal center and for the center line between the two pages. I can add an image to fill the background or use solid colors.
The individual images are copied, pasted, re-sized to fit and then saved as a PhotoShop .PSD file.
The current book is a little cramped because I'm trying to jam the whole wedding, about 55 images, into six pages (12 sides). In the real world I'd have about twice as many images and 4 times as many pages to display them.

When the page is finished I convert it to sRGB, flatten it and save it as a Quality 12 JPEG and it's ready to FTP. I retain the .PSD files because, once again in the real world, I'd soft proof the book with the client before committing it to the printer.
Our current project is creating a presentation Wedding Book.
http://www.albexus.com/
Each student is required to create six pages as if we were putting together the entire album for a client.
I created a template for a 10"x10" album with true panoramic pages. It's essentially a 20" wide x 10" high page configured for 300 dpi.

The individual images are copied, pasted, re-sized to fit and then saved as a PhotoShop .PSD file.
The current book is a little cramped because I'm trying to jam the whole wedding, about 55 images, into six pages (12 sides). In the real world I'd have about twice as many images and 4 times as many pages to display them.

When the page is finished I convert it to sRGB, flatten it and save it as a Quality 12 JPEG and it's ready to FTP. I retain the .PSD files because, once again in the real world, I'd soft proof the book with the client before committing it to the printer.
Thursday, November 4, 2010
Maddy
One of our assignments in portraiture is photographing children on location.
This is Maddy.
Lessons Learned:
Take your vitamins. Two year olds are ACTIVE!
Do not try to photograph an active two year old anywhere near a water feature.
Grandma makes a good baby wrangler. Two year olds always come when Grandma calls.
Judicious application of Gaussian Blur makes a "romantic" portrait and can conceal certain problems (see lesson 2 above about water hazards).
Have fun.
This is Maddy.
 |
| Pentax K10D, Tokina ATX 28-70f/2.8, ISO 100, f/5.6 @ 1/60 sec |
Take your vitamins. Two year olds are ACTIVE!
Do not try to photograph an active two year old anywhere near a water feature.
Grandma makes a good baby wrangler. Two year olds always come when Grandma calls.
Judicious application of Gaussian Blur makes a "romantic" portrait and can conceal certain problems (see lesson 2 above about water hazards).
Have fun.
Canyon de Chelly
Pronounced "Canyon de Shay", Canyon de Chelly National Monument is a unique part of the National Park System.
It's located on Navajo Tribal Trust Land owned by the Navajo Nation. They call themselves the Diné (the people) and the canyon is their home, while park is administered by the National Park Service. Access to the canyon itself is restricted. Visitors may travel inside the canyon only when accompanied by Park Rangers or authorized Navajo guides.
The one exception is the White House Ruin trail.
Six miles from the visitor center, the trail descends 600 feet from a rim overlook to the bottom of the canyon, and across Chinle Wash to the base of the White House ruin, abandoned about 700 years ago. The Navajo call the Puebloans who lived here "the Ancient Ones". The walk down to White House ruin takes about 30 minutes, but allow two hours for the round trip.
You'll see frequent signs reminding photographers not to photograph the local people or their dwellings without their permission.
It's located on Navajo Tribal Trust Land owned by the Navajo Nation. They call themselves the Diné (the people) and the canyon is their home, while park is administered by the National Park Service. Access to the canyon itself is restricted. Visitors may travel inside the canyon only when accompanied by Park Rangers or authorized Navajo guides.
 |
| Pentax *ist-D, Sigma 300f/2.8, ISO 200 1/.500 @ f/3.5 |
Six miles from the visitor center, the trail descends 600 feet from a rim overlook to the bottom of the canyon, and across Chinle Wash to the base of the White House ruin, abandoned about 700 years ago. The Navajo call the Puebloans who lived here "the Ancient Ones". The walk down to White House ruin takes about 30 minutes, but allow two hours for the round trip.
You'll see frequent signs reminding photographers not to photograph the local people or their dwellings without their permission.
Thursday, October 28, 2010
Another Wedding
Part of the Portrait Studio Management curriculum at Randolph Community College is the Mock Wedding. For some students the Mock Wedding will be the first opportunity to put all of their training together into a single "real world" experience. The Mock Wedding allows students to photograph their "first wedding" in an environment where it won't cost them too dearly if they have problems.
Sort of a dress rehearsal for what you face in the real world.
It's your average small intimate wedding. One bride, one groom, one best man, one maid of honor ... 12 wedding photographers.
With a very few exceptions, all of the parts are taken by students. The wedding party is made up mostly of first year photography students, and the wedding is organized by second year students with massive amounts of assistance from a few former students.
One exception is the clergy.
We held this years Mock Wedding at the Church of the Good Shepard in Asheboro, NC and the minister gave a talk on wedding etiquette for photographers. The most important lesson I learned from her is to make sure the prospective bride & groom provide a copy of the church's photography policies early in the negotiations for the contract.
This gives the couple the opportunity to avoid surprises, and allows the photographer to advise the couple whether the venue is going to permit the kind of photography they want.
Mostly the Mock Wedding is a chance to show that you know your equipment from the point of view of what can go wrong, what can you do when it does go wrong, and what backup equipment to have along. By this time in your career, you should know your equipment backwards and forwards. If you do, you'll sail through the Mock Wedding.
If you don't, the Mock Wedding will make your shortcomings abundantly clear.
Sort of a dress rehearsal for what you face in the real world.
 |
| Pentax K20D, DA SMC 18-55, ISO 800, f/5.6 @ 1/10 sec |

With a very few exceptions, all of the parts are taken by students. The wedding party is made up mostly of first year photography students, and the wedding is organized by second year students with massive amounts of assistance from a few former students.
One exception is the clergy.
We held this years Mock Wedding at the Church of the Good Shepard in Asheboro, NC and the minister gave a talk on wedding etiquette for photographers. The most important lesson I learned from her is to make sure the prospective bride & groom provide a copy of the church's photography policies early in the negotiations for the contract.
This gives the couple the opportunity to avoid surprises, and allows the photographer to advise the couple whether the venue is going to permit the kind of photography they want.
Mostly the Mock Wedding is a chance to show that you know your equipment from the point of view of what can go wrong, what can you do when it does go wrong, and what backup equipment to have along. By this time in your career, you should know your equipment backwards and forwards. If you do, you'll sail through the Mock Wedding.
If you don't, the Mock Wedding will make your shortcomings abundantly clear.
Monday, October 25, 2010
Why Two Lane Photography?
I spent 15 years as a field service tech. The company I worked for promised our clients an on-site response to their problems within 24 hours - 7 days a week; 50 States, Puerto Rico and the Virgin Islands. There were 58 of us to provide that level of service.
I covered a 625,000 square mile territory; the eastern two-thirds of the State of North Carolina, and provided backup for the technicians in Georgia, western North Carolina, South Carolina, Virginia and Tennessee.
Needless to say, I stayed on the road a lot. Averaged 1500 miles a week just getting there.
And a lot of "there" wasn't on the interstate. Nor could you use the national highway network to get from point A to point B. Not unless you wanted to add a whole lot more miles and a lot more hours on the road. So, I became very familiar with two lane county roads and state highways - the ones that could get me where my customer was located without adding another hundred miles to the trip.
I went in all kinds of weather, every season, year in and year out. And I began to see the light, the sometimes limitless vistas and the natural beauty of the landscape as I passed through it. I've had a camera of one sort or another since I was 8 years old, but along the way the journey I was making inspired me to move my photography up a notch. I started carrying a 35mm SLR camera along with me and stopped occasionally to photograph what moved me.
And still managed to make good time.
Sometimes, the quickest route took me down this road.
This is the Blue Ridge Parkway, somewhere between Roaring Gap in North Carolina and Fancy Gap in Virginia. If you want a location more specific than that, you'll have to go find it for yourself. It's right after sunset. I love this time of year. There's something special about autumn light in the Blue Ridge.
I covered a 625,000 square mile territory; the eastern two-thirds of the State of North Carolina, and provided backup for the technicians in Georgia, western North Carolina, South Carolina, Virginia and Tennessee.
Needless to say, I stayed on the road a lot. Averaged 1500 miles a week just getting there.
And a lot of "there" wasn't on the interstate. Nor could you use the national highway network to get from point A to point B. Not unless you wanted to add a whole lot more miles and a lot more hours on the road. So, I became very familiar with two lane county roads and state highways - the ones that could get me where my customer was located without adding another hundred miles to the trip.
I went in all kinds of weather, every season, year in and year out. And I began to see the light, the sometimes limitless vistas and the natural beauty of the landscape as I passed through it. I've had a camera of one sort or another since I was 8 years old, but along the way the journey I was making inspired me to move my photography up a notch. I started carrying a 35mm SLR camera along with me and stopped occasionally to photograph what moved me.
And still managed to make good time.
 |
| HDR image - Pentax K20D, Sigma EX30mmf/1.4DC ISO 800 @ f/8 +1.3 -0.3 -1.3 |

Sometimes, the quickest route took me down this road.
This is the Blue Ridge Parkway, somewhere between Roaring Gap in North Carolina and Fancy Gap in Virginia. If you want a location more specific than that, you'll have to go find it for yourself. It's right after sunset. I love this time of year. There's something special about autumn light in the Blue Ridge.
Thursday, October 21, 2010
First "Official" Wedding
I finally got the opportunity to shoot a wedding. This is what I've been going to school for, preparing myself to shoot weddings and portraiture as my source of retirement income.
I was actually second shooter, so I gained experience without the pressure of having to be responsible for the whole thing I'd have had as the primary. Still, I wanted to do the best job I could, and I think I did well.
All things considered, it went remarkably well. I only had one fumble, when a set of spare batteries I'd brought proved to be defective. Fortunately, I was carrying four sets, and it only took me a couple of minutes to figure out what was wrong and get a functioning set installed.
I shot in RAW+JPEG and copied the jpegs off onto CDs for the couple before leaving the reception. Filled 3.5 CDs. I was worried that I wouldn't have enough. Next time I'll carry DVDs.
I'm pleased with how it turned out. I made fewer mistakes the first time out than I anticipated and the mistakes I did make were correctable on the spot, so I feel I was able to give the customer good value.
 |
| Pentax K20D, SMC DA18-55, ISO 400, f/5.6 @ 1/50 sec - AF 540FGZ flash, PTTL at -1 stop |

All things considered, it went remarkably well. I only had one fumble, when a set of spare batteries I'd brought proved to be defective. Fortunately, I was carrying four sets, and it only took me a couple of minutes to figure out what was wrong and get a functioning set installed.
I shot in RAW+JPEG and copied the jpegs off onto CDs for the couple before leaving the reception. Filled 3.5 CDs. I was worried that I wouldn't have enough. Next time I'll carry DVDs.
I'm pleased with how it turned out. I made fewer mistakes the first time out than I anticipated and the mistakes I did make were correctable on the spot, so I feel I was able to give the customer good value.
Wednesday, October 20, 2010
Washington, DC
We had fall break at school this past weekend, and I drove up to Northern Virginia to take the Washington Metro into DC. I have an assignment for class to create a 360 degree panorama and went to the National Mall for the opportunities it presents.
I've had some images in my head for a while and I thought while I was up there, I might try to do something about them.
I've had some images in my head for a while and I thought while I was up there, I might try to do something about them.
 |
| Pentax K20D, SMC Pentax DA18-35 II, ISO 100, f/8, 119 sec. |

 |
| Pentax K20D, SMC Pentax DA18-35 II, ISO 100, f/8, 30 sec. |

 |
| Pentax K20D, Tokina ATX-Pro 80-200, ISO 100, f/8, 2 sec. |

Thursday, October 14, 2010
Sunrise 10-10-10
I took a break this past weekend to spend some time with my first love, Nature Photography.
I scouted the location at Cades Cove in the Great Smokey Mountains National Park on Saturday so I'd know where I wanted to be when sunrise came on Sunday. I had a particular location on Sparks Lane that I wanted to photograph as the first rays of morning sun broke the rim of surrounding mountains.
Cades Cove is not open to vehicle traffic until after sunrise, but you can park in the main parking area before dawn. I made it to the Cades Cove entrance gate at 6:00 am and walked to my chosen location to set up and await the sun.
I did not allow for the fact that due to the surrounding terrain, the sun would not actually break the horizon until some time after official sunrise. While I was waiting for the light, another park visitor drove his monster pickup truck up and parked right into the middle of my scene.
Plan B.
I had taken my 300mm lens along even though my aim was to make wide angle scenic views capturing the morning fog, directional light and emerging fall colors. As I was relocating to a new position, I noticed some vague movement out in one of the fields. I mounted the 300 and set my tripod down.
I managed to capture two frames. This crop is approximately 1/4 of the first frame.
I didn't get the shot I wanted, but I'm happy with the shot I got.
Besides, now I've got an excuse to go back.
I scouted the location at Cades Cove in the Great Smokey Mountains National Park on Saturday so I'd know where I wanted to be when sunrise came on Sunday. I had a particular location on Sparks Lane that I wanted to photograph as the first rays of morning sun broke the rim of surrounding mountains.
Cades Cove is not open to vehicle traffic until after sunrise, but you can park in the main parking area before dawn. I made it to the Cades Cove entrance gate at 6:00 am and walked to my chosen location to set up and await the sun.
I did not allow for the fact that due to the surrounding terrain, the sun would not actually break the horizon until some time after official sunrise. While I was waiting for the light, another park visitor drove his monster pickup truck up and parked right into the middle of my scene.
Plan B.
I had taken my 300mm lens along even though my aim was to make wide angle scenic views capturing the morning fog, directional light and emerging fall colors. As I was relocating to a new position, I noticed some vague movement out in one of the fields. I mounted the 300 and set my tripod down.
I managed to capture two frames. This crop is approximately 1/4 of the first frame.
 |
| Pentax K20D; Sigma 300mmf/2.8; ISO400; f/5.0 @ 1/30sec |

Besides, now I've got an excuse to go back.
Thursday, October 7, 2010
A Little Photoshop Magic
I am always on the lookout for ideas to aid me in improving the presentation of my photography. One of the problems I've encountered is an inability to truly represent the range of tones in some image.
Case in point - This is the Colorado 145 just south of Telluride, mid-October 2007. I took the San Juan Skyway Scenic Highway from Durango north to Silverton and then around back south headed for Cortez. It was a blustery, dark cloudy day, without much scenery because of the thick storm clouds .. until I hit this stretch of highway. The sun broke through and the aspens burst into glorious gold.

I've never been able to do justice to what I saw. Everything I ever tried with the image resulted in a dull lifeless image. I either couldn't get the brilliant gold foliage or I couldn't get the brooding cloud cover shrouding the mountains.
Until I found a tutorial on Luminosity Masking by Tony Kuyper.
http://goodlight.us/index.html
Luminosity masks are a series of Photoshop actions Tony came up. Luminosity masks are self feathering and make the kind of selective adjustments I was looking for in this image possible.
The image above has two masks applied to curves adjustments layers - one for the highlights, and one for the shadows following the instructions Tony gave for creating the Luminosity Masks.
I won't go into details, you should see Tony's tutorials for yourself.
Case in point - This is the Colorado 145 just south of Telluride, mid-October 2007. I took the San Juan Skyway Scenic Highway from Durango north to Silverton and then around back south headed for Cortez. It was a blustery, dark cloudy day, without much scenery because of the thick storm clouds .. until I hit this stretch of highway. The sun broke through and the aspens burst into glorious gold.

I've never been able to do justice to what I saw. Everything I ever tried with the image resulted in a dull lifeless image. I either couldn't get the brilliant gold foliage or I couldn't get the brooding cloud cover shrouding the mountains.
Until I found a tutorial on Luminosity Masking by Tony Kuyper.
http://goodlight.us/index.html
Luminosity masks are a series of Photoshop actions Tony came up. Luminosity masks are self feathering and make the kind of selective adjustments I was looking for in this image possible.
The image above has two masks applied to curves adjustments layers - one for the highlights, and one for the shadows following the instructions Tony gave for creating the Luminosity Masks.
I won't go into details, you should see Tony's tutorials for yourself.
Subscribe to:
Posts (Atom)